New! TypeRocket v5 is now available. See docs.
Access all of Typerocket. Get Pro.
Theme Options
( v4 )
- # Enabling Theme Options
- # Your options, your ideas
- # Going custom
- # Configuring the custom page
- # Configuring the theme name
- # Adding custom fields
- # Fields into your templates
- # Text fields
- # Image fields
- # Textarea fields
- # Advanced fields
- # Adding tabs and fields
TypeRocket 4.0 makes adding theme options for WordPress simple. Add any number of custom fields you want.
Enabling Theme Options
TypeRocket works as a theme options framework for WordPress by providing the custom fields you need to customize your themes. To get started all you need to do is enable the theme-options plugin in the TypeRocket configuration in the file config/app.php.
'plugins' => [
    '\TypeRocketSEO\Plugin',
    '\TypeRocketPageBuilder\Plugin',
    '\TypeRocketThemeOptions\Plugin', // theme options plugin
    '\TypeRocketDev\Plugin',
    '\TypeRocketDashboard\Plugin',
],
Your options, your ideas
Theme options are commonly used to manage the global elements of a WordPress theme's design. These elements could be as simple as the copyright information at the bottom of every page; to API keys for Google Maps or Facebook Sharing.
You can use any of the fields that come with the forms api. This means you can have 18+ types of fields.
- Text inputs
- Passwords
- Hidden inputs
- Submit buttons
- Textareas
- Editors
- Radio buttons
- Checkboxes
- Select menus
- WordPress Editor
- Color pickers
- Date Pickers
- Images
- Files
- Galleries
- Items lists
- Matrix Fields
- Builder Fields
- Repeaters
- Search fields
Going custom
Out of the box, the theme options plugin comes with its own template file named page.php. You will need to override this file.
- Duplicate the
page.phpfile located in./vendor/typerocket/plugin-theme-options/. - Place the new file in the root of your custom theme's directory.
- Rename the new file to
theme-options.php.
If you want to start from scratch delete the code inside the file.
Next, you need to let the theme options plugin know that you are going to use theme-options.php as the new admin page.
Configuring the custom page
In your theme's functions.php file add a filter for tr_theme_options_page. This will replace admin.php with theme-options.php.
// functions.php
add_filter('tr_theme_options_page', function() {
    return get_template_directory() . '/theme-options.php';
});
Configuring the theme name
To wrap up configuration, change the theme options name with the filter tr_theme_options_name.
// functions.php
add_filter('tr_theme_options_name', function() {
    return 'my_theme_options';
});
Adding custom fields
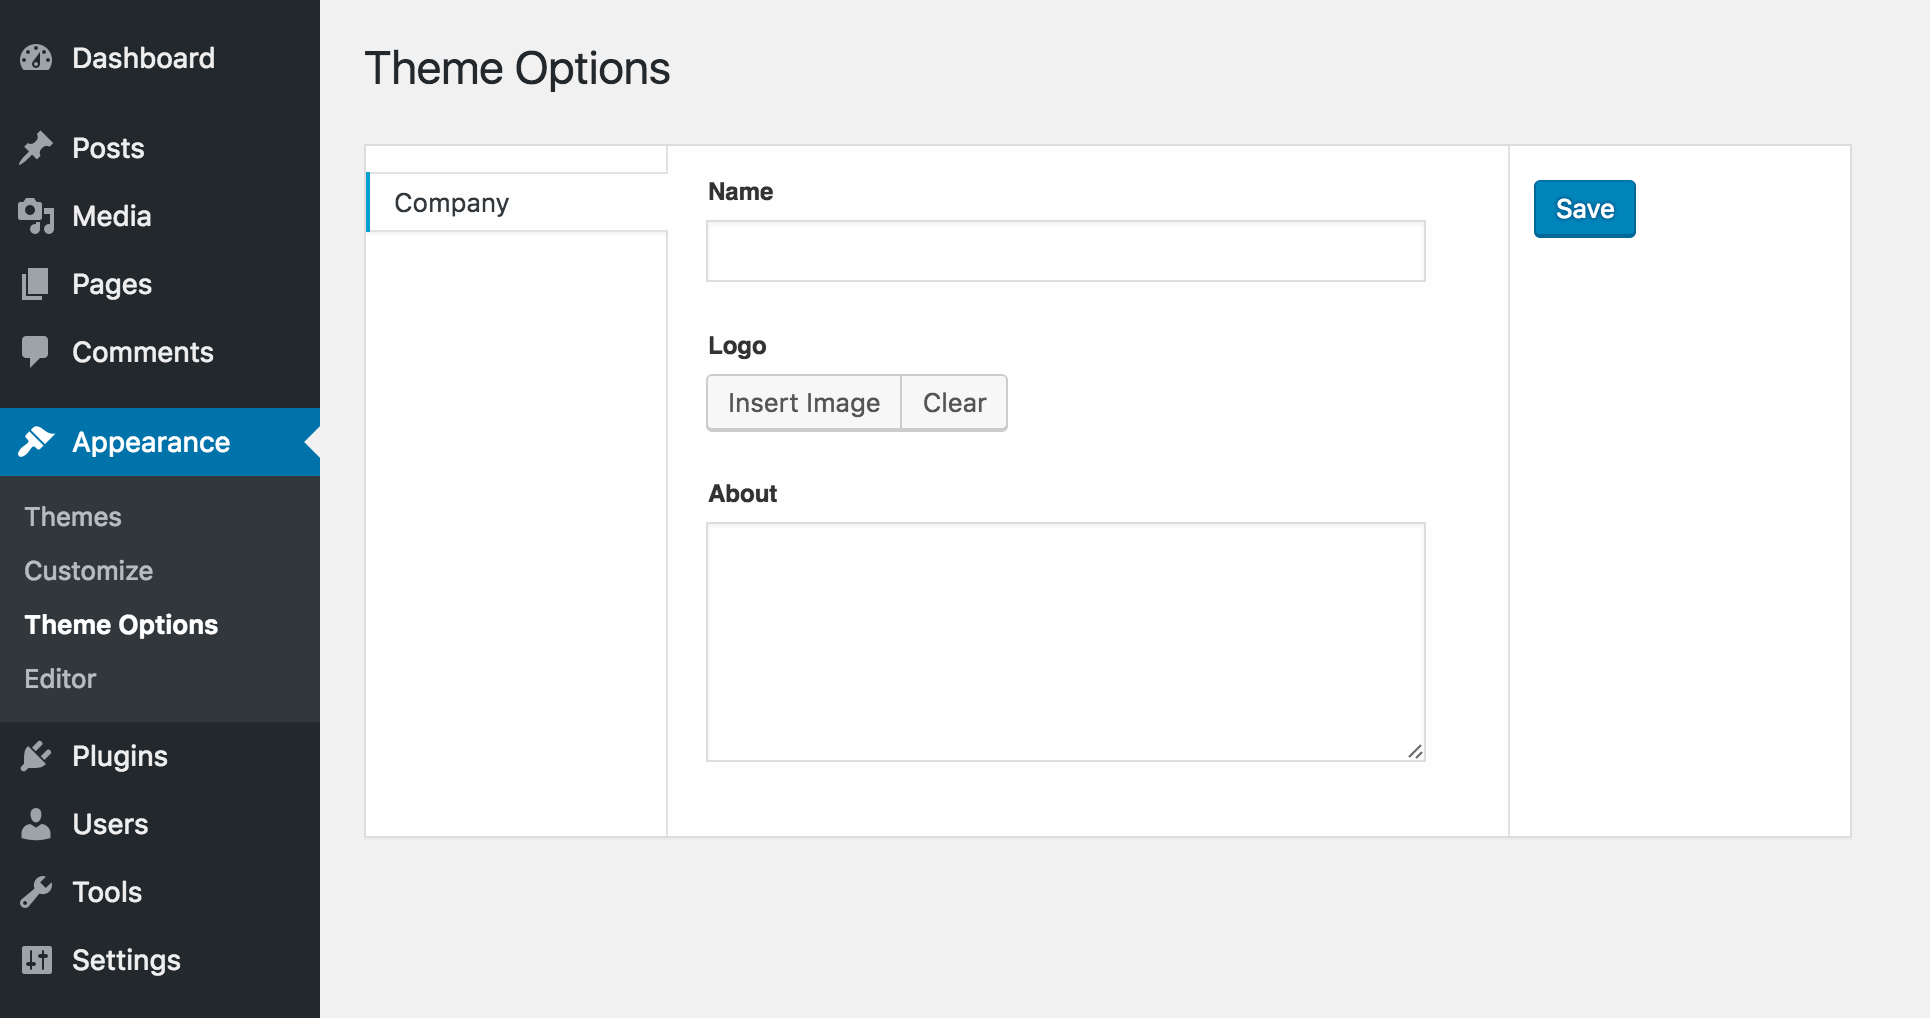
Now, let us start with the bare minimum. Use the code below as the contents of the theme-options.php file.
<h1>Theme Options</h1>

<?php
$form = tr_form();
$form->useJson();
$form->setGroup( $this->getName() );
?>

<div class="typerocket-container">
    <?php
    echo $form->open();

    // about
    $company = $form->text('Name');
    $company .= $form->image('Logo');
    $company .= $form->textarea('About');

    // save
    $save = $form->submit( 'Save' );

    // layout
    tr_tabs()
    ->setSidebar( $save )
    ->addTab( 'Company', $company )
    ->render( 'box' );
    echo $form->close();
    ?>
</div>
If you have debug mode enabled you will see the export/import feature at the bottom of the page. Otherwise, the code hints and export/import will be removed.
Fields into your templates
With debug mode enabled you can copy the code hints into any theme template file.
Finally, you can get the basic field types into the templates: Text, Image, and Textarea.
Text fields
For text fields, a using echo will work just fine. However, don't forget to sanitize all user entered data on output.
// footer.php
echo tr_options_field('my_theme_options.name');
Image fields
The image attachment ID is saved for image fields. Using a function like wp_get_attachment_image() will get the <img /> tag.
// header.php
$imgId = tr_options_field('my_theme_options.logo')
echo wp_get_attachment_image($imgId, 'full');
Textarea fields
For a textarea you can use nl2br() or wpautop(). Because wpautop() adds <p> tags over <br> tags in most cases you should use that.
// sidebar.php
$about = tr_options_field('my_theme_options.about');
echo wpautop($about);
Advanced fields
If you decide to use advanced fields like repeaters and galleries you can use var_dump() to inspect the fields.
Adding tabs and fields
Now that you have the most basic setup you can start adding more tabs and fields.
- Tabs API
- Forms API (fields are near the bottom)
- Fields API
Found a typo? Something is wrong in this documentation? Fork and edit it!